ROASTED ASPARAGUS, MUSHROOM AND SHALLOT SOY-FREE VEGAN MINI QUICHES

Thursday, April 23, 2015

Egg-Free, Soy-Free, Dairy-Free Mini Quiches


Roasted Asparagus, Mushroom and Shallot Mini Quiches
    Makes 12 mini quiches

Ingredients:
  • 1 pre-prepared vegan pâte brisée (pie dough), recipe below*
Filling
  • 4 oz button baby portobello mushrooms, diced
  • 1/2 bunch asparagus, trimmed and chopped into 1” pieces
  • 2 medium shallots, halved lengthwise and thickly sliced
  • 3 medium cloves of garlic, crushed
  • 1 tablespoon olive oil
  • 1/2 tablespoon balsamic glaze or balsamic vinegar (I definitely prefer glaze, but if you use it just make sure you find one that is dairy-free)
  • Coarse salt and fresh cracked pepper
"Egg” mixture (adapted from this recipe)
  • 1/2 cup chickpea flour
  • 1 1/4 cups water
  • 1/3 vegetable stock cube (1 full cube should make 2 cups stock)
  • 1/2 teaspoon turmeric
  • 1 1/2 tablespoons nutritional yeast
  • 1/4 teaspoon salt (according to the original recipe you can add black salt/kala namak to give it more of an egg flavor. However, I couldn’t find black salt in any of the stores near me so I went without and it still tasted great.)
Method:

Preheat oven to 400 F. Roll out the pie dough on a floured surface until it is about 1/8 inch thick. Cut out twelve 4" circles (I used a mug with a 4" diameter to cut the circles into the desired size. But you could also use a cookie cutter, a small bowl/tupperware container, etc). Press the circles into a 12-cup muffin tin. Using a fork, poke several holes at the bottom of each pie crust and blind bake for 10 minutes (I chopped up the vegetables while I was baking the crust).

Preheat oven to 425 F. In a large bowl, combine chopped vegetables and toss with olive oil, balsamic glaze, salt, and a generous amount of fresh pepper. Spread veggies out on a cookie sheet and bake for 15-20 minutes until asparagus is bright green and tender. (As an aside, these roasted veggies are absolutely delicious on their own or tossed over a bed of mixed greens. I kept snitching them after they came out of the oven - I’m surprise there were actually any left for the quiche.)

Now make your eggless/soyless quiche mixture!

Whisk together the chickpea flour and 1/2 cup of water and set aside. In a small saucepan, add the final 3/4 cup of water, the stock cube, nutritional yeast, turmeric, and salt. Once the water comes to the boil, slowly add the chickpea mixture while stirring continuously. After all the mixture has been fully combined, lower the heat and stir until the mixture becomes thick and glossy (about 1-2 minutes). Remove from heat and add the roasted vegetables to the "egg" mixture.  Mix well and spoon into the individual pie crusts.

Bake at 425 F for 20 minutes. Remove from oven, brush with melted earth balance, and return to oven for another 5 minutes.

Roasted Asparagus, Mushroom, and Shallot Vegan Soy-Free Mini Quiches
*Vegan Pie Crust
Ingredients:
  • 2 1/2 cups all-purpose flour
  • 1 teaspoon salt
  • 1 teaspoon sugar
  • 1 cup (2 sticks) earth balance
  • 1/4 to 1/2 cup ice water
Method:

Cut butter into small cubes and chill in freezer for about 10 minutes. While butter is chilling, combine flour, sugar, and salt in a large mixing bowl. Add butter and rub it into the flour with your fingertips (you can also use a fork, a pastry cutter, or even a food processor instead of your hands) until mixture resembles coarse meal. Add 1/4 cup of the ice water and continue to work the mixture with your fingertips until dough comes together in moist clumps. If the dough is too dry, work in more water 1 teaspoon at a time until you reach the desired consistency. Gather dough into a ball and flatten into a disk. Wrap in plastic and chill until firm, at least 1 hour.

Roasted Asparagus, Mushroom, and Shallot Vegan Soy-Free Mini Quiches


I'm constantly torn between craving the positive health effects of eating a vegan diet and simply craving cheese. I've been on-again-off-again vegan for many years, and I'm still not sure which I love more -- cheese or good health. I'm off the vegan bandwagon at the mo but recently I've been contemplating diving back into veganism. Which is why, after Kaitlin and I decided to make quiche this week, I wanted to attempt a vegan version (and because I love a challenge — pretty much the whole reason I got into vegan cooking in the first place). Since most store-bought vegan imitation meat/dairy products are soy-based, I try to avoid soy in my own cooking when I can, both because I think it's important to consume varied sources of protein and also because, like I said, I love a challenge.

Fortunately, these soy-free vegan quiches were a success! I kept a few in my fridge to eat during the week and froze the rest for my potential return to veganism. However, one of my first thoughts after biting into my quiche was "all this needs is bleu cheese and it would be perfect." So, that return to veganism might be much farther off than I planned. Or maybe attempting a vegan bleu cheese is in order (the immense difficulty but awesome payoff of that challenge is already luring me in...stay tuned, I may soon blog a vegan bleu cheese recipe).

Bleu cheese or not, this vegan quiche is pretty amazing. To see a more traditional quiche (that DOES include bleu cheese omgyes), check out Kaitlin's recipe for caramelized onion, zucchini, and blue cheese quiche.

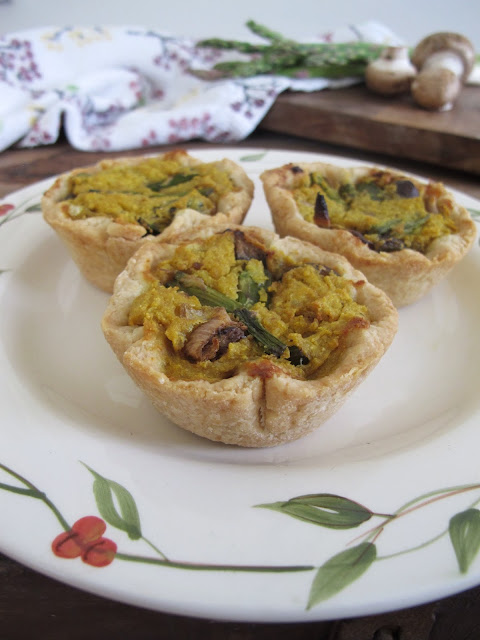
Roasted Asparagus, Mushroom, and Shallot Vegan Soy-Free Mini Quiches

CARAMELIZED ONION, ZUCCHINI, AND BLUE CHEESE QUICHE

Or, “How to Impress Your Mother-in-Law with Quiche”
(I love alternate titles-- it’s very Vonnegut.)

Carmelized Onion, Zucchini, and Blue Cheese Quiche


Carmelized Onion, Zucchini, and Blue Cheese Quiche


Caramelized Onion, Zucchini, and Blue Cheese Quiche
Serves 4-6

Ingredients:

• 1 prepared homemade healthy piecrust
• 2 red onions, cut in strips “French-style”
• 2 tablespoons olive oil
• 1 tablespoon brown sugar
• 2 teaspoons balsamic vinegar or balsamic glaze
• 1 small zucchini, chopped in quarters
• 1-2 cups fresh spinach
• 2 tablespoons (30 grams) blue cheese, crumbled
• 4 eggs
• 1 cup milk
• ½ cup cream
• ½ teaspoon nutmeg
• salt and pepper to taste


Method:

Pre-heat oven to 350 F (180 C) then prepare homemade piecrust, crimping sides to desired design. Poke several holes into the base of the crust with a fork and wrap small strips of foil around the sides of the pan to prevent the edges burning. Pre-bake crust until lightly browned, about 15-20 minutes.

Meanwhile, caramelize the onions in the olive oil by sautéing them in a cast iron pot or other deep-walled pan over medium heat until translucent. Then, turn the heat low and continue cooking the onions until nicely browned, about 20-40 minutes for gas to electric stovetops, respectively. Add the brown sugar and the balsamic and cook for another 4-5 minutes.

Add these to the bottom of the pre-baked piecrust and cover with chopped zucchini, crumbled blue cheese, and spinach. You may wish to lightly sauté the spinach in the onion pan for 2-3 minutes if you prefer cooked spinach.

Combine the eggs, milk, cream, nutmeg, salt and pepper in a medium-size bowl and then pour this mixture over the veggies.

Cook quiche for 30-50 minutes, until a knife comes out clean and the top is browned (turn the grill setting on for the final 5-10 minutes to allow the top heating element to brown the surface of the quiche).

Carmelized Onion, Zucchini, and Blue Cheese Quiche

Quiche is the ultimate brunch dish--that’s a fact.

The famous eggy-pie can be made ahead and either frozen or set-aside until re-heating, so it’s incredibly convenient for those big-menu mornings when you’re trying to tackle pancakes, hash browns, fruit bowls, chia puddings, and mimosas all in the 15 minutes before guests arrive. I hope it goes without saying that quiche is an excellent dinner main, too.

I discovered the joys of quiche-for-dinner when I lived with my grandma for my four college years. My grandma, universally accepted as one of the greatest women alive, has long maintained that she “only cooks breakfast food,” so the Quiche Lorraine recipe from our treasured 1970-edition Betty Crocker Cookbook was an easy segue into evening-meal territory. We ditched the ham (because vegetarianism y’all), but often loaded that piecrust up with any and every vegetable we had on hand. Quiche is convenient and versatile. You can eat it all year by throwing in whatever ingredients you have fresh, so these opposite-season blogger friends love it!

This particular Caramelized Onion and Blue Cheese recipe is sponsored by originality despair. Christy was making her totally amazing non-tofu vegan quiches and I was like… ….. What do I do?! I can’t just take a page out of Betty Crocker and color myself clever. Girl has gotta go where no quiche has gone before!

So... I borrowed a page out of my boyfriend’s book instead. Yeah! He made up an incredible homemade pizza recipe using caramelized onions and/or bhuna pyaz (Indian fried onions), blue cheese, and zucchini and it’s drool-worthy. So I said, Imma put those things in a piecrust and pour eggs over them.

Voilà! Quiche Kaitlin.

Carmelized Onion, Zucchini, and Blue Cheese Quiche

I think the end result is damn good. If you find yourself in a tizzy over what to make your mother-in-law for the next brunch or dinner date, this dish is mighty impressive. The time-intensive caramelized onions prove you are willing to put the effort in, and the blue cheese and zucchini pairing is just uncommon enough to surprise her without breaking any culinary rules. Throw in the unbelievably easy homemade piecrust and you can’t go wrong!

Unless, like me, your partner’s mother is a lifelong vegetarian who lives in India and has never eaten eggs. Then maybe just go with soup.


Carmelized Onion, Zucchini, and Blue Cheese Quiche


Carmelized Onion, Zucchini, and Blue Cheese Quiche


FEIJOA AND LIME SANGRIA

Tuesday, April 14, 2015


Feijoa and Lime Sangria

Feijoa and Lime Sangria


Feijoa and Lime Sangria
 Serves 6-8
Feijoa and Lime Sangria
Ingredients: 


  • 1 bottle (750ml) New Zealand white wine
  • 1 cup Mac's Feijoa and Pear Sparkling Fruit Juice (or similar)
  • 3.5 oz Light Rum (or gin or vodka)
  • 1/2 cup Coconut Lime Simple Syrup* (recipe below)
  • 2 feijoa, sliced
  • 1 small lime, sliced
  • 1 small lemon, sliced


  • Method:
      Slightly muddle cut fruit in the bottom of a glass pitcher. Combine all other ingredients in the pitcher and let chill one hour before serving. Serve over ice if desired.


    Coconut Lime Simple SyrupCoconut Lime Simple Syrup
     Makes 1 cup

    Ingredients:


  • 1 cup white sugar
  • 1/2 cup coconut water
  • Zest of 1 lime
  • 1/2 cup fresh lime juice 


  • Method:
      Set the sugar and coconut water over medium heat, stirring constantly until the sugar has dissolved (about 3-4 minutes). Remove from heat and stir in lime zest and lime juice. Transfer to jar or other container and let chill for one hour. **You may wish to sieve the zest out before combining with sangria ingredients.


    Feijoas
    Introducing.... FEIJOA

    These little green gems are autumn's only blessing in New Zealand. The upside-down part of the world doesn't celebrate the transition from summer to autumn with any of the same vigor as Americans, who drink pumpkin spice lattes while taking photos of their boot-clad feet in piles of leaves. This is April, so there's no Halloween or Thanksgiving, and no one even knows how to carve a pumpkin. Further, our Kiwi summers are mild, and far too short if you ask me, so there's no delight in the "relief" from summer heat that cooler autumn temperatures usually bring for Americans. No, in New Zealand, the end of summer is mourned. The cooling temperatures signal the end of long, warm nights around the barbecue, and active weekends at the beach, and quickly usher in 8 horrid months of freezing rain, bone-chilling wind, and depressing grey skies, in what I like to view as the true essence of the Maori title for New Zealand: Aotearoa, the "Long White Cloud." 

    All this to say, woo hoo for feijoa and the small relief they bring from the sense of impending doom. Mix them with alcohol and you definitely have something to contend with those overpriced Pumpkin Spice Lattes.


    Feijoa and Lime Sangria

    Feijoa trees are native to South America and were introduced to New Zealand in the 1920s where ideal growing conditions have made them a wild success here. Outside of Brazil or NZ, you might have been lucky enough to locate a feijoa or two at a farmer's market in hippy places like Portland, or source an imported variety in places like Los Angeles or New York City, where no health food is denied to you. More than likely, if you've found this page from a Pinterest or google search, you are a Kiwi. And you, like me, adore all things feijoa.

    If you're not Kiwi or Brazilian and are wondering what feijoa tastes like, GOOD FREAKING LUCK finding someone to describe it to you. As a test, I often ask Kiwis to tell me what they think feijoa tastes like and this is the typical response: "feijoa? Yeah, it tastes like... feijoa, eh?" Brilliant. The truth is, it's a totally unique flavor not quite like anything you've tasted before. The internets tells me it's called the "Pineapple Guava" elsewhere, but this is false. It does not taste like pineapple or guava or any combination therein. Let me see if I can describe it for you: feijoa tastes a little bit sour, a little bit sweet; a little bit earthy, like something long-forgotten from childhoods spent running free and careless, tasting foraged acorns and wild fruit. Feijoa's sweet pulpy nucleus is in the shape of a groovy X and surrounded by a harder, slightly sharp-tasting fruit siding. If you're a real fanatic, like my boyfriend, you pop the fruit in your mouth whole, eating the green skin and all. But most people cut the fruit in half and dig out the center with a wee spoon. Other people slice it up and pour booze over it. Your choice.

    This Feijoa and Lime Sangria recipe is amazing. And I'm not just saying that because I invented it. The recipe has a lot going for it which makes it unlike any other sangria you've tried: the unique flavor of feijoa is complimented by the sweetened citrus simple syrup and mixed with a glorious New Zealand white wine. I topped mine with Mac's feijoa and pear fruit drink, which is a tart and bubbly delight. You can use whatever juice/mixer suits your tastes.

    When you get right down to it, this sangria is crisp and a little bit sweet, but mostly it's holding on to the last few days of summer warmth, while honoring the changes that autumn brings. Feijoa is our savior, bearing the weight of our resignation and quiet hopes for a mild winter ahead. We love you, feijoa.


    Feijoa and Lime Sangria
    And yes, that is a box that says "Florida" on it. It's usually my magazine rack, but today it brought the warmth of home to the photo shoot. Small comforts for expat hearts.


    ELDERFLOWER AND CITRUS SANGRIA

    Elderflower and Citrus Sangria

    Elderflower, Ginger Beer, Cirtus Sangria


    Elderflower and Citrus Sangria
       Serves 6-8

    Ingredients: 
    • 1 bottle (750ml) dry white wine
    • 2 bottles (12 oz) Crabbie’s ginger beer*
    • 3.5 oz Saint Germain
    • 1 orange, sliced
    • 1 lemon, sliced
    • 1 lime, sliced

    Intructions:

      Combine all ingredients in a pitcher and let chill one hour before serving. Serve over ice if desired.


    *You can, of course, use a different brand of ginger beer if you prefer. Just like you can use tomato ketchup instead of tomato sauce on your spaghetti if you prefer. Yes, Crabbie’s is that much better than regular ginger beer. They’ve only recently started selling it in the US, but if you find a store near you that sells it, buy every single pack they have, because once you try it you won’t be able to get enough.

    Saint Germain

    This is the first time I’ve tried Saint Germain and it is most certainly as delicious as the whole internet world makes it out to be. After googling through various white wine sangria recipes, I stumbled across one that used Saint Germain. Having no idea what that was, it was back to google, where I found this article. I discovered that Saint Germain is a liqueur made from elderflowers. I also discovered that the people who pick these elderflowers from the French hillside where they grow transport them back to the factory on bicycles. Bicycles. That’s some super whimsical dedication right there (not to mention inefficient. But they’re French so whimsical but inefficient dedication is kind of their specialty). On top of Saint Germain being delicious, the bottle is insanely gorgeous and makes the perfect addition to my imaginary pinterest-worthy bar cart where I keep my extensive and equally imaginary alcohol collection.


    Between the sweet and unusual elderflower liqueur, the spicy ginger beer, and the bright citrus, this drink has the perfect combination of light and refreshing flavors that balance each other wonderfully. It was certainly the perfect drink for this Tuesday Boozeday which could not have come sooner. Except it could have, which is why I made this drink on Monday. I came back up from Florida last Monday, and it’s been one of those weeks where everything takes about 3x longer than you think and every time you do accomplish a task three more sprout up in its place.

    When I picked the kids I nanny for up from tutoring (which they attend on Mondays and Thursdays), I asked their tutor why she hadn’t given them enough homework to last through the weekend. “I gave you two packets - one for Tuesday and one for Wednesday." Oh, right, the weekend isn’t for another 4 days. The crushing and disorienting realization made me want to simultaneously break down crying and laugh hysterically. I decided to make this post a day early, because if I can’t make Friday happen on Monday, at least I can make it Tuesday Boozeday whenever I want.

    Elderflower and Citrus Sangria

    HUNTERS - SPRING

    Saturday, April 11, 2015

    Red Hunters

    Red Hunter Boots

    These Hunter boots are far and away one of my favorite items in my closet. In part because, as Kaitlin explained in her Hunter post, they are a classic piece that fit well in any wardrobe, no matter the trends of the moment. In addition to that, they are also extremely practical — the first time I ever used them was during my first month in Princeton and there was a heavy and unexpected snowfall. My naive Floridian mind was blown at how warm and dry my feet stayed in my Hunters even well traipsing through the snow.

    But the reason I love my bright red Hunters is all because of Ramona Quimby. (If you’ve never read this children’s series, then I’m truly sorry to inform you that you never actually had a childhood.) When Ramona is 5, her mother buys her a brand new, gloriously shiny pair of red rain boots. And ever since I read that story, I longed for my own pair of rain boots just like Ramona's. Seriously, I held onto this desire for 15 long years and then finally on my 23rd birthday I received these Hunters as a birthday present from my boss.

    How to style red Hunter boots

    Every time I see my rain boots, I feel a bit of glee and satisfaction looking at the fulfillment of one of my childhood dreams. Though I’m not positive what my 7-year-old self would think of me now (I mean, why in the world haven’t I married Joshua Jackson yet?! What am I doing with my life that could be more important?), I’m certain she would adore my gorgeous red Hunters just as much as I do and be proud of me for finally owning a pair.


    On a different note, my 25-year-old self is proud of me for incorporating these bright red boots into a “Spring” outfit. I told Kaitlin when we first decided to do this post that I I feel like these boots lend themselves well to every season EXCEPT Spring (soft, muted colors is where it’s at for Spring, and bright red certainly does not fit into that category…or even complement the colors in that category). But I accepted the challenge Barney Stinton style and I’m pretty pleased with the result. The anthropologie top with its ivory and white stripes and floral undershirt paired with the muted grey lace skirt feels very Spring to me, but the red tones in the flowers still coordinate well with my Hunters. (Yes, I put this much thought into my outfits. Obviously, the question you are asking by now is am I super committed to do I need to be committed? ...Please don’t answer that.)

    Styling red Hunter boots

    So, my beloved red Hunters can work in Spring too. Just one more reason to love them. Although, Kaitlin’s response after seeing the photos was, “but why does it look like fall?” For the love of God stop paying attention to the background and keep you eyes locked on the floral pattern on my shirt ONLY. It’s SPRING, OK?!

    HUNTERS - AUTUMN


    Autumn Hunters

    Let me take this opportunity to be honest: fashion posts scare me. Christy is naturally stylish... she just has to shake her little, ring-adorned hands and chic drips off. She doesn't even have to try! It's probably the killer blonde bob and the unfailing confidence. I, on the other hand, exist somewhere in the (easy, safe) realm of practical-fashion-meets-minimalist-design. Luckily for me, minimalist is IN... and pretty much always is. 

    See, classic is easy-- you invest in well-structured pieces that evolve with the trend cycles and you're always set. Trench coats, fitted denim, black heels, white blouses, grey tees, Birkenstocks, Converse Sneakers, Hunters.


    Black Hunters for Autumn


    Yeah. Rain boots! In New Zealand, we call them gumboots. In the UK, they were popularized in the 19th century and went by the name Wellies or Wellingtons. Which happens to be the name of the city I lived in when I bought my first pair of Hunters.

    Wellington, New Zealand is not just the home of Peter Jackson, Lord of the Rings fame, and the capital of the nation, it's the windiest city in the world (sit down, Chicago). Welly is a city full of life, culture, to-die-for food, gorgeous scenery, and the best flat whites in both hemispheres, but it's also a miserably grey place for 90% of the year. Moving from the sunny beaches of forever-summer Florida, and settling for a year in the windswept city of Wellington was a shock to my vitamin-D-depleted system. If I was going to battle epic wind storms, perpetual rain, and 6.9 magnitude earthquakes, I was going to do it in functional style, dammit! Enter Hunters. 

    The day they arrived, I opened the door to a courier holding a long, slender box marked "Hunter," and shouted, "YAY!!!" Startled, the courier took a step back and laughed. "Wow, I guess this must be for you. What's got you so excited?!" he asked. "Gumboots!" I sang, hands outstretched to take the parcel. "Oh... well, to each their own!" See, in NZ, gumboots are a highly practical wardrobe staple usually reserved for tramping through the farm, or a rain-soaked garden.  They are not high fashion, nor typically a source of parcel-delivery glee. 

    But I tell you what, I've now gotten more compliments on my Hunter boots, by both men and women, than ANY other item in my entire wardrobe. That's a big win for functional, classic design.


    Black Hunters for Autumn


    For Easter weekend, two of my closest girl friends and I went on a girls' trip to Lake Rotorua. We stayed at a family bach (that's a holiday home, for you non-Kiwi folk) right on the lakefront and these stunning poplars in the garden were my first glimpse of fall foliage for the year. In Auckland, the subtropical climate and harbor city landscape does little in support of autumn color change. Rotorua, on the other hand, 2.5 hours south of Auckland and one of the richest sources of geothermic activity globally, was full of budding autumn hues. The perfect place for a Hunters shoot.


    Lake Rotorua

    Lake Rotorua


    Just look at those stunning views.

    When I asked my friends if they'd be willing to help snap a couple photos of me wearing the boots, they really got into it! Both girls work in the New Zealand film industry so Eva jumped in the lake to capture the best photos of the jetty in afternoon light, and Jen declared herself the Props Assist and began collecting fallen leaves in her shirt. 

    The gems!

    They made the photo shoot heaps of fun and the photos are just gorgeous. 


    Photographer Eva May
    Props Assist Jen


    Hunters for Autumn


    Acro Yoga with Hunters

    And, naturally, when you put three acro yogis together for a photo shoot... we can't resist incorporating a flying pose. ;)


    SILK FLOWER HALF-CROWN

    Friday, April 10, 2015

    Silk Flower Half Crown DIY

    During my Pinterest hunt for flower crown tutorials/inspiration, I rarely came across a pin that wasn’t specifically targeted towards brides, and the very few non-wedding related ones were geared towards Coachella attendees. Since I fall into neither of those categories (and have no plans to any time soon), I felt marginalized and forgotten. C’mon, blog world, could you be any more prejudiced? Do I really either have to have a ring on my finger or tickets to a music festival to be considered worthy of your flower crown tutorials?

    This post is my attempt to be the change I want to see in the world (because I’m sure making flower crown-wearing more acceptable for people in all walks of life is what Gandhi had in mind when he made that statement). So, I would like to firmly and publicly state that no matter where or why you intend to wear your flower crown, this tutorial is for you.


    Now that I'm riding a flower-crowns-are-for-everyone high horse, I decided to use silk flowers so in the future I could easily incorporate a flower crown into an outfit without having to forage in my garden first. (If you are interested in making a flower crown using fresh flowers/leaves/vines, you can see Kaitlin’s take on our flower crown theme.)

    Materials:
    • Elastic braided headband (like this)
    • Silk flowers
    • Hot glue

    Instructions:

    1. Take your flowers and remove the stem where it meets the base of the flower.

    2. Poke the base of the flower in between the braids of the headband. (Mine stayed put pretty well even before I glued them, so I was able to try it on and move them around to get the flowers exactly where I wanted them without having to guess what it would look like once I was wearing it.)


    3. Hot glue the base of the flower to the headband. Apply the glue both in between the base and the headband and where the flower is poking through the headband.


    4. After the crown dries, trim down the part of the flower that’s poking through the headband. Otherwise deal with it painfully stabbing you in the head the whole morning at church on Easter Sunday. Your choice.


    That's it! Once your flower crown is finished, feel free to wear it wherever/however your beautiful little heart desires with zero expectation or judgement from this diy blogger.


    I also made a flower crown for my precious niece to wear on her first Easter. Instead of using a headband, I used floral wire and followed this tutorial. Train ‘em young (and in this case really young), and the next generation won’t even realize there was a time where flower crowns weren’t for everyone. Sigh. That’ll be the day.


    FORAGED FLOWER CROWN

    DIY Foraged Flower Crown

    Thanks to Pinterest and an unimaginable increase in woodsy wedding themes, the wearing of flower crowns is no longer associated with hippy bohemians and 7-day, shower-less music festivals. While the flower children of 1960s America popularized them, the Scandinavians have been wearing flower crowns for generations… and the Ancient Greeks before them. 

    DIY Foraged Flower Crown


    DIY Foraged Flower Crown

    But for those of us neither Nordic by birth, or hippy by choice, the rebirth of flower crowns in the modern age presents exciting possibilities. Unfortunately, as Christy pointed out in her silk flower crown post, those darn woodsy brides seem to be getting all the attention. We believe in a floral headdress revolution-- the normalizing of wreath-wearing outside of special occasions and music festivals. Vive la révolution!

    DIY Foraged Flower CrownDIY Foraged Flower Crown


    You’ll be happy to know that, as it turns out, flower crowns are INCREDIBLY EASY TO MAKE.


    DIY Foraged Flower CrownDIY Foraged Flower Crown
    I made these two crowns in under an hour each, including time for foraging.


    The most difficult task in the whole endeavor was sourcing floral tape. In New Zealand, as I have learned time and time again, unusual commodities and supplies can be outrageously difficult, or even impossible to find. I went to a few craft stores and was told that these shops did not carry (nor care) about such things as floral tape. Feeling a bit bummed, I stopped at a flower shop on the way home fully expecting that they both knew of and cared about floral tape, but suspecting they would be unwilling to sell me theirs. I was amazed to find, instead, the most helpful florist in history. She unwrapped a bit of tape off her own roll and gave me a small fistful of floral wire and then proceeded to give me helpful hints about how to best make a floral crown. God love her. Thank you, florist of Titirangi, Auckland--you gem!

    If you live in the States, you can probably skip the whole painful effort of trying to find floral tape by hitting up your local Michael’s or other large-scale craft supplies shop. If you live in New Zealand and know of an actual supplier of floral tape, feel free to share in the comments section here.


    Foraging for materials for a DIY Flower Crown

    Once you’ve got the tape, you’re ready to forage. I took a real four-year-old fairy into the New Zealand bush (the back garden) with me to cut and collect materials. In NZ’s autumn, there weren’t many colorful blooms, but we found lots of gorgeous greenery, berries, and a few shapely succulents.


    Isn't this photo magic? God love morning light and New Zealand ferns.

    Foraging tips:
    • Cut with a good bit of extra stem as you will need length when securing the bundles.
    • Find a sturdy vine of some variety. This makes the best “base” for the crown.
    • Know private vs. public flower etiquette. I had a fair bit of garden envy during this project and I even pulled over to the side of the road twice to jump out and snip a beautiful bloom, but I was always careful to do so on what appeared to be public property.
    • Know that hardy, leafy greenery will hold up the longest, as well as succulents. Petal flowers and abundant weeds like daisies will shrivel up within hours of snipping.
    • Keep an open mind about what might be beautiful in the crown. The most interesting bundles had a variety of simple greens, colour, and textures.
    • Scented plants like rosemary and lavender add a gorgeous, subtle air of perfume to the floral crown.
    • Handle all petal flowers gently. These suckers fall apart like a child’s sand castle faster than you can say, “fml.”
    • Watch out for thorns. You can snip large ones off, but it’s best not to use stems that are too prickly. The Jesus look doesn’t work for everybody.
    • Shake out and/or wash your foraged goodness. I inadvertently invited a large quantity of small spiders into my home for Round 2 of this exercise.
    • Have fun! Fairy girl and I danced, ran, and clambered through the garden while we foraged. Maybe even put on a fairy costume. Do what makes you feel like a woodland princess--we live in a miserable, concrete world and getting our hands dirty in the garden makes big and little humans feel alive and wild. 


    What you need for a DIY Foraged Flower Crown

    Once you’ve spread out your finds, tie the vine around your own head for size and secure by wrapping the ends back around the crown. Then begin grouping pieces together in small bundles. Secure these bundles with the floral tape, leaving extra tape loose to secure it in place on the vine (or use a fresh piece of tape). For the heavier pieces, such as the succulents, you may wish to use floral wire to hold the weight tightly around the vine base. Group the bundles until you can cover the entire length of the vine (about 6-8, depending on size). Secure the bundles to the vine, one over the next, starting in the back. Voila! Flower crown for the cost of pennies.


    DIY Foraged Flower Crown

    DIY Foraged Flower Crown


    DIY Foraged Flower Crown


    DIY Foraged Flower Crown